
Once you've logged in, you should see a screen similar to this:
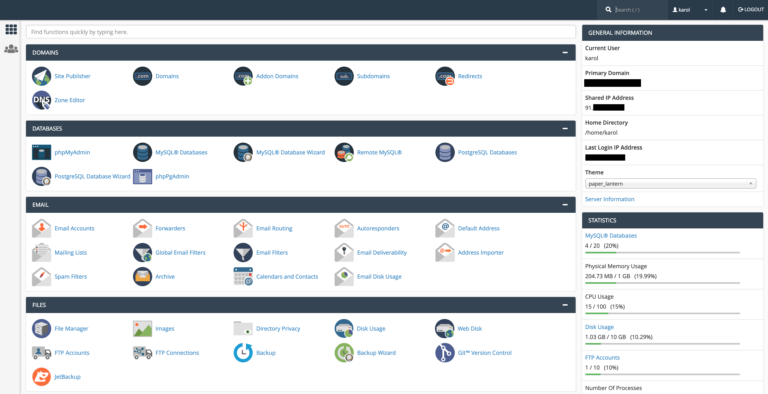
This is the newest version of cPanel for 2020. It uses a theme called 'Paper Lanternâ€.
You can find the navigation bar in the top right corner of the screen. In it, there's a simple search field, a link to your user preferences, a notifications bell, and the logout link.

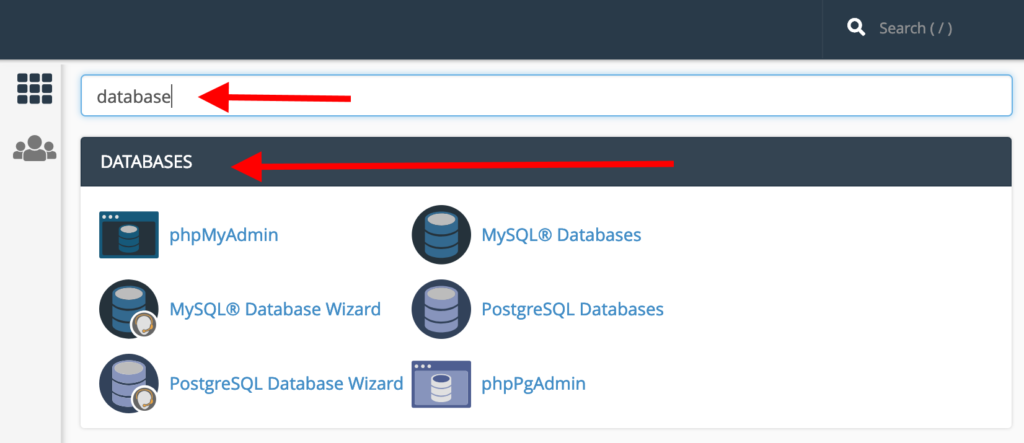
One additional search field - apart from the one in the navigation bar - is visible at the very top of the page right below the navigation bar.
This one works pretty similarly, but this time, instead of showing you results inside a drop-down, it's going to filter out the center part of cPanel. Just punch in what you're after, and cPanel will dig it up for you.
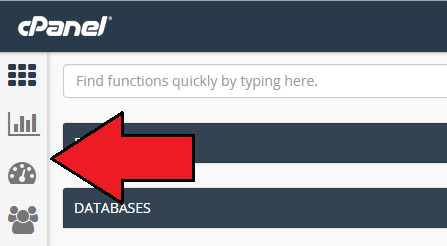
On the left side of your screen, you'll see a sidebar with a couple of icons - the exact number depends on what your host makes available for you. In our case, from the top down, these stand for Home, Statistics, Dashboard, and User Management.
You can collapse sections by clicking on the '-†sign in the top right corner of each homepage section to minimize it.

If you like to, you can also drag and drop entire sections to reorganize them and put the most commonly used ones near the top.
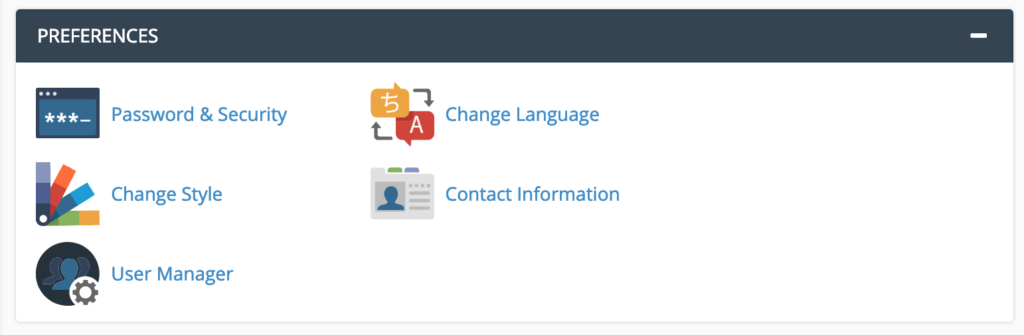
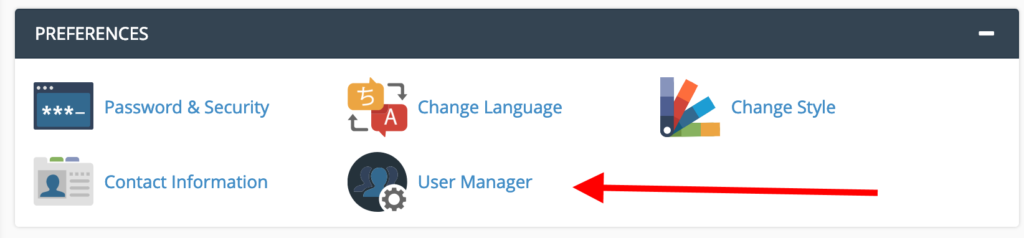
When you first log in to cPanel, make sure you visit the 'PREFERENCES†section to update your contact information and change your password.
Here's how to do this step by step:
We strongly recommend changing your password as soon as you log in to cPanel for the first time.
Click on 'Password & Securityâ€. You'll be taken to this screen:

You'll have to enter your old password before choosing a new one.
When it comes to setting up a new password, you can either take advantage of the Password Generator or come up with something on your own. Using the Password Generator is likely the right way to go, as it will give you a strong and secure password. Just click the button and let the generator take care of the rest:

The best way to save that password is to use a password manager (like LastPass - free). That way, you don't have to memorize the password. No matter what you do, DON'T save your password in a Word file or something similar on your computer - where it could be easily discovered.
One of the most important things you must do in cPanel is to provide an email where you can receive updates when needed.
Why this step is crucial:
To get to these settings, click on 'Contact Information†to reach the following screen:

We recommend having all the boxes under 'Contact Preferences†checked, as they're all updates that could alert you to suspicious activities (e.g someone else changing your password) or a hosting problem (e.g disk space being used up).
Let's say you want to work with someone to help you manage your websites, or you have a trusted business partner who also needs access to the hosting setup. That person will require their own user profile in cPanel.
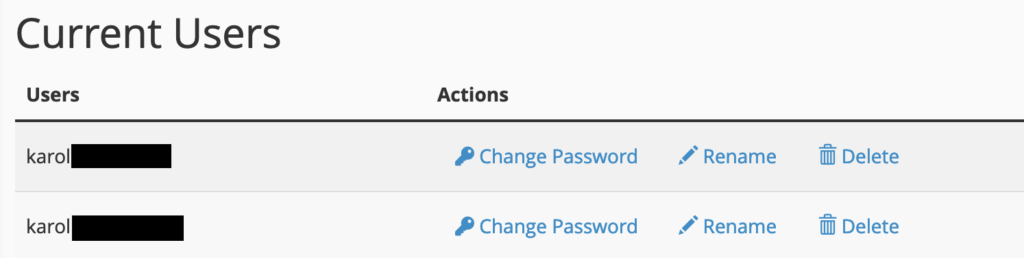
To do that, click on the 'User Manager†icon that's in the same 'PREFERENCES†section.
You will be taken to the following screen:
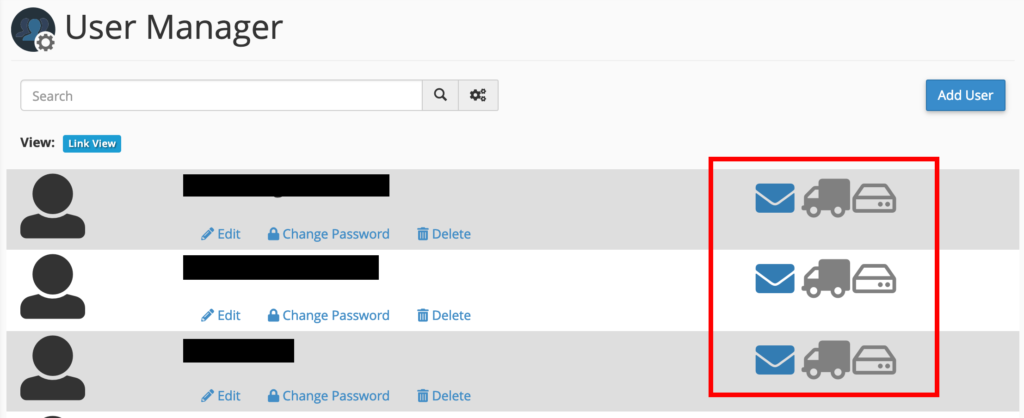
In that section, you can see all accounts that are currently set in your cPanel. There are three icons next to each account (you can see them in the screenshot above):
You can easily edit any user there, change their password or delete them with the options listed below the account name.
To add a new user, click on the 'Add User†button in the top right corner:

You'll then be taken to the following screen:
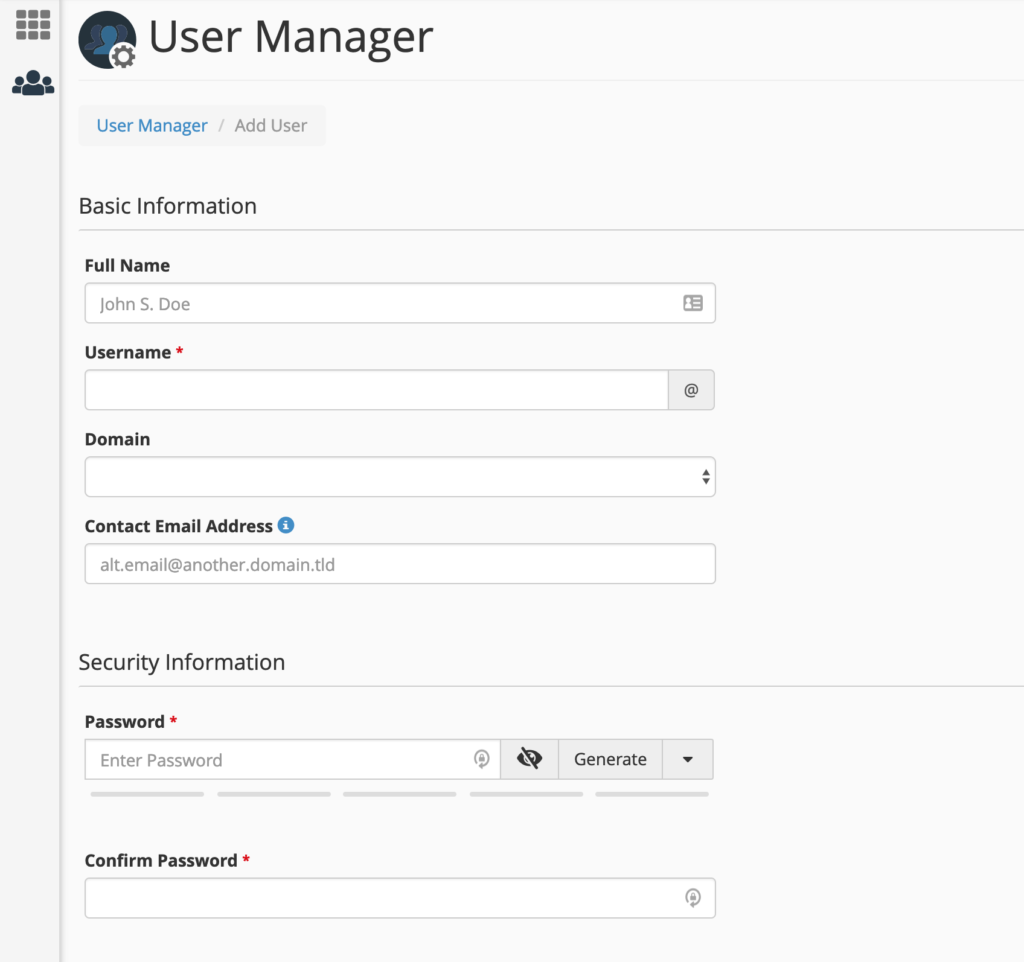
You'll add the user's full name, the username, the domain that the new user should be associated with, and if you want, an alternative email that the user can be reached at. You'll also be asked to create a password for the user.
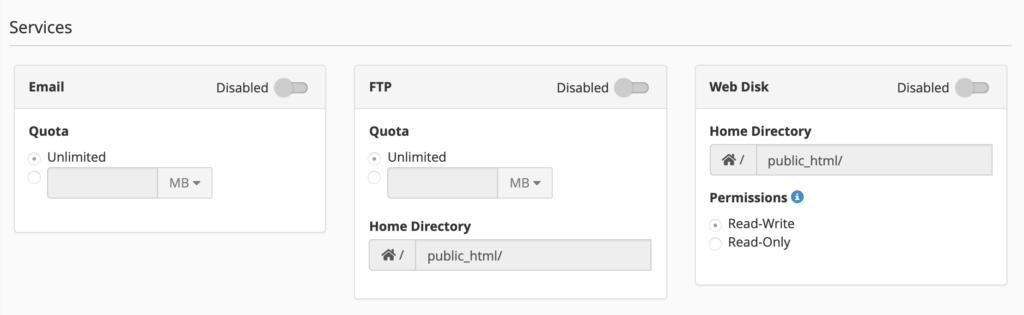
Just below these fields, you'll find a section called 'Services†where you can take care of a handful of key settings. Interestingly, they correspond to the three icons that we described just a couple of paragraphs above:
When you've finished with these settings, click on 'Create†or 'Create and Add Another User†at the bottom of the settings page.
The 'DOMAINS†section of cPanel is your go-to place when you want to add a new domain name (the one you've just purchased) to your hosting account, manage your existing domains, as well as set up subdomains.
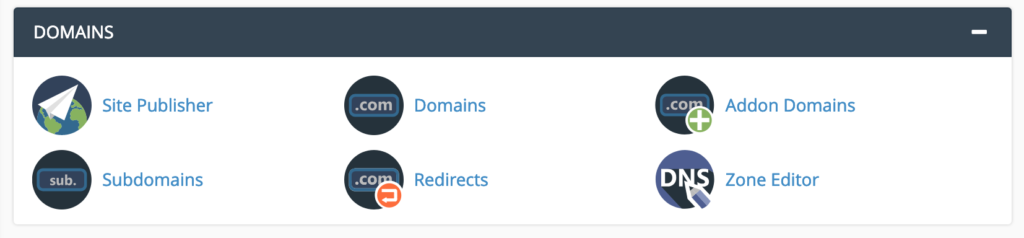
To add a domain name to your cPanel (and thus, your hosting package), you'll need to click on 'Addon Domains†in the 'DOMAINS†section shown above.
An addon domain is a fancy name for a standard domain name that you can use to create a fully-functional website - meaning you can host multiple domain names from the same control panel.
On the 'Addon Domains†screen, you'll be asked to enter your new domain name plus a couple of other parameters:
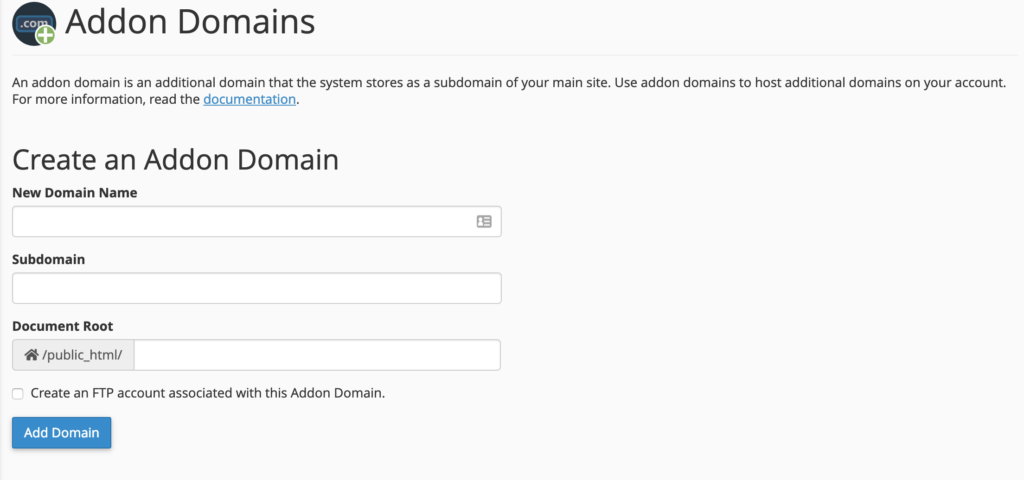
www. part.Click on 'Add Domain†to finish up.
On that same 'Addon Domains†screen, there's a section called 'Modify Addon Domain†where you can take care of any domains currently assigned to your account - this includes managing them, setting redirections, or removing domains completely.
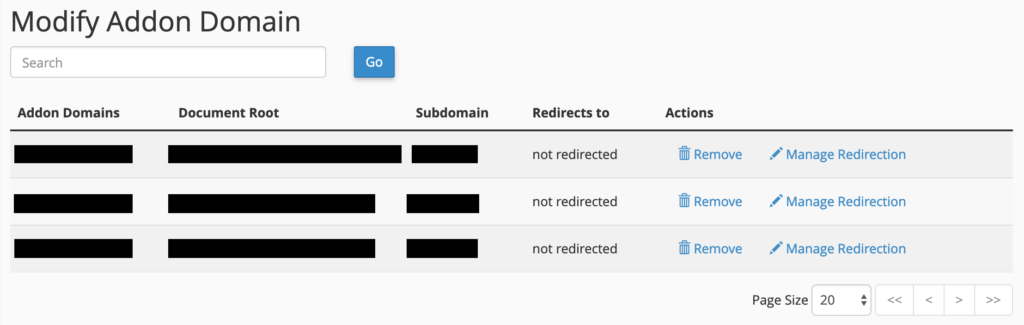
The usage here is straightforward. There are links for removing and managing the redirections on the right. Clicking on any of them will show you another settings panel where you can confirm the deletion or enter the destination that you want to redirect the domain to.
Every time you add a new domain to your account (covered above), cPanel will also create a corresponding subdomain to go alongside. Here's how that usually works, based on an example:
Let's say your cPanel account name is john and the host is called greathost.com. In that case, your primary server domain is going to be john.greathost.com. Once you add a new addon domain, say, johnsworld.com, cPanel will also create a subdomain called johnsworld.john.greathost.com.
Now, what's unfortunate about such a setup is that this new subdomain often holds a carbon copy of your normal website that's available under johnsworld.com. In other words, you get the same website available twice, under two addresses: johnsworld.com and johnsworld.john.greathost.com.
This is not ideal from an SEO point of view. To fix that, what you should do is redirect that new subdomain to your standard domain. To say it another way, after doing that, whoever tries to go to johnsworld.john.greathost.com will be automatically redirected to johnsworld.com.
Here's how to do that:
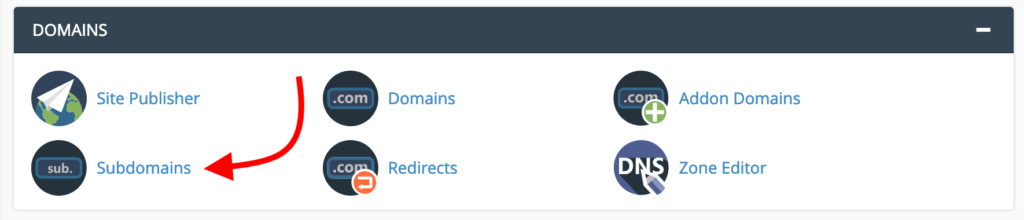
First, click on 'Subdomains†from the 'DOMAINS†section:
You'll be taken to a panel where you can see all of your current subdomains that have been set up.
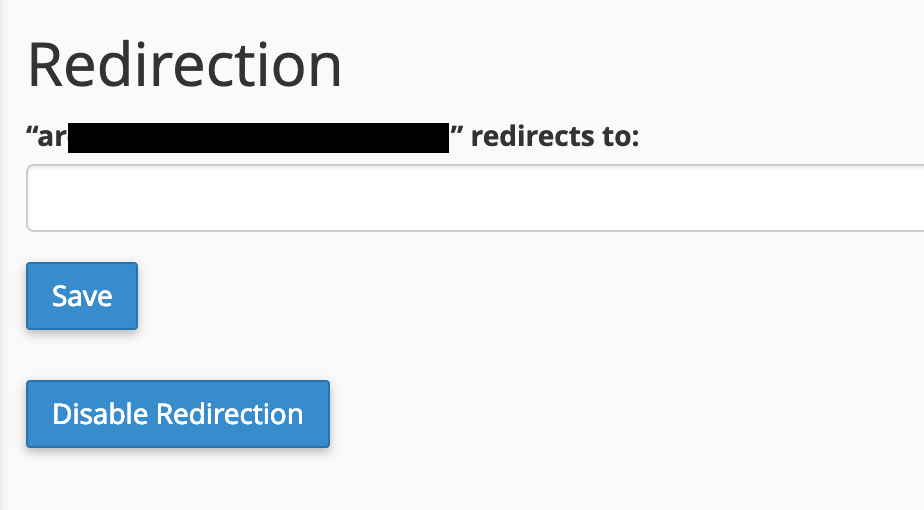
At this stage, the 'Redirection†column is likely blank.

To edit that, click on the 'Manage Redirection†link next to the subdomain you want to edit. On the next screen, set up the redirection by entering the full domain name that you want to redirect to. In our example, that's johnsworld.com. Click on 'Save†when done.
Subdomains are not only about causing minor inconveniences but also about letting you expand certain areas of your site in a creative way.
For example, if you want to launch a new blog as part of your website, a good approach is to do that under a subdomain. For instance, if your main website is, again, at johnsworld.com, then you could consider launching a blog under blog.johnsworld.com.
In this case, blog is just an example. You have full freedom to choose whatever subdomain you want.
You can create a custom subdomain on the same screen where you took care of managing the existing ones. Just fill out the form that's at the top.
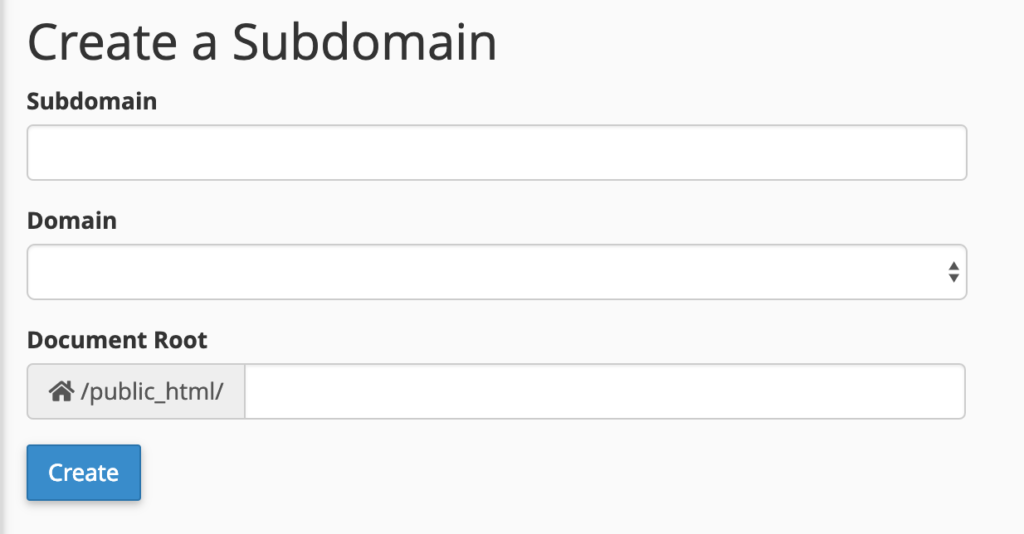
blog.johnsworld.com.Click on 'Create†to finalize the subdomain setup.
One of the great things about keeping your domain name with a cPanel-enabled web host is that you also get the possibility to create custom email accounts for that domain.
This all happens in the 'EMAIL†section of cPanel.
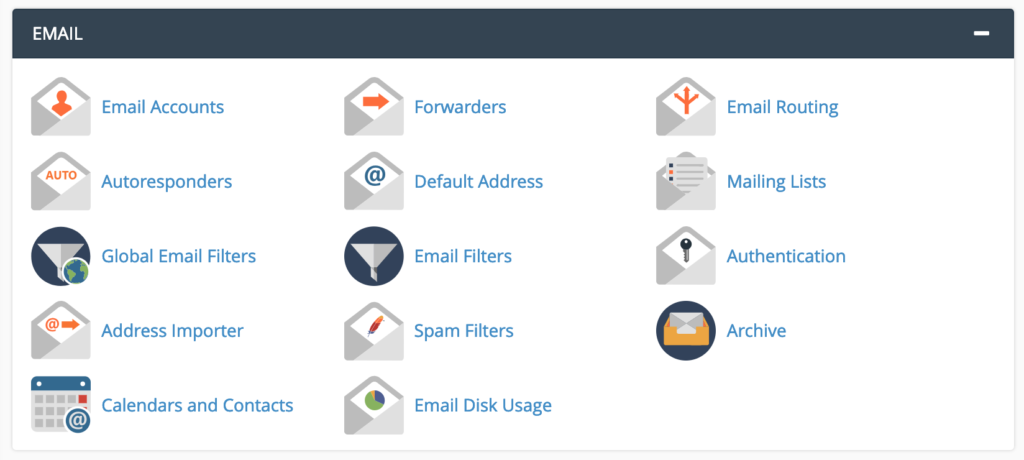
As you can see, there's plenty of tools there - from creating new emails, setting forwarders, autoresponders, taking care of spam, and more.
Naturally, this is the first thing you will want to do. To add a new email account to your domain, click on 'Email Accounts†to be taken to the following screen (make sure you're on the first tab - 'Add Email Accountâ€):
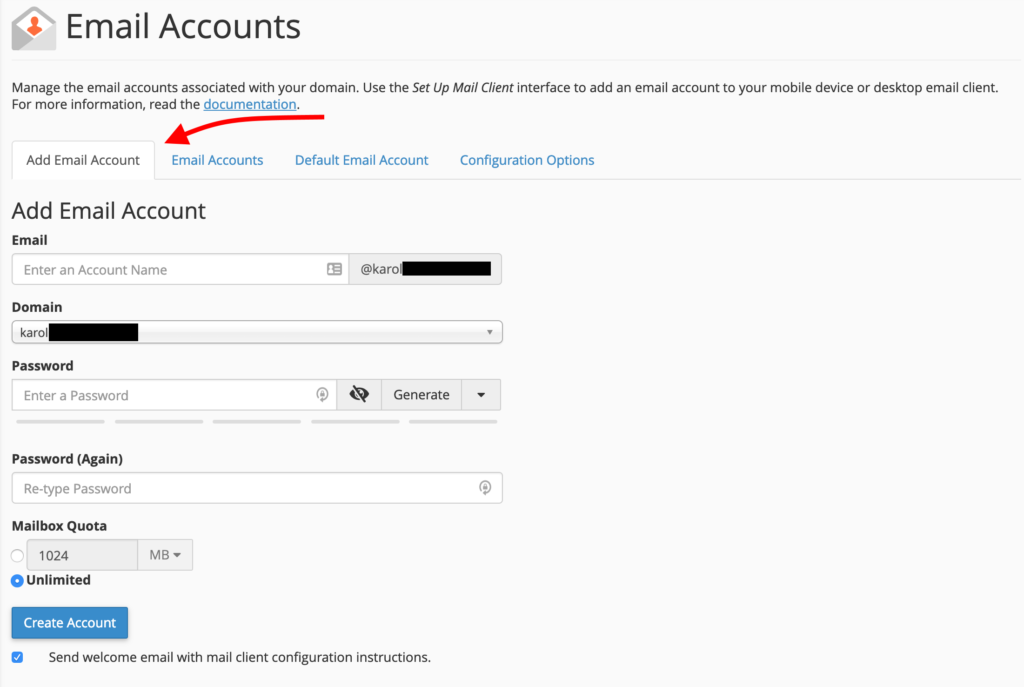
From top to bottom, here's how to get your new account set up:
hello or yournameOnce you've done all of the above, you'll notice that the email you just created has been added to the list of the existing email accounts in the 'Email Accounts†tab:
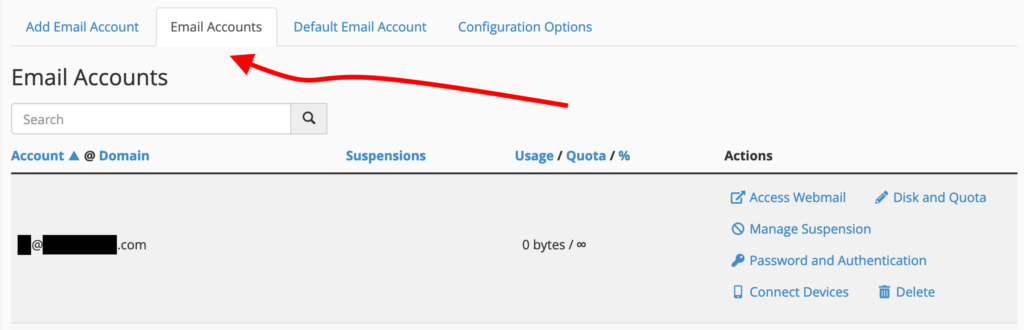
You can manage every element of that account later on - including the password, quota, and other details.
Now that you've set up an email account - how do you use it?
You have two main options here:
Let's start with the former:
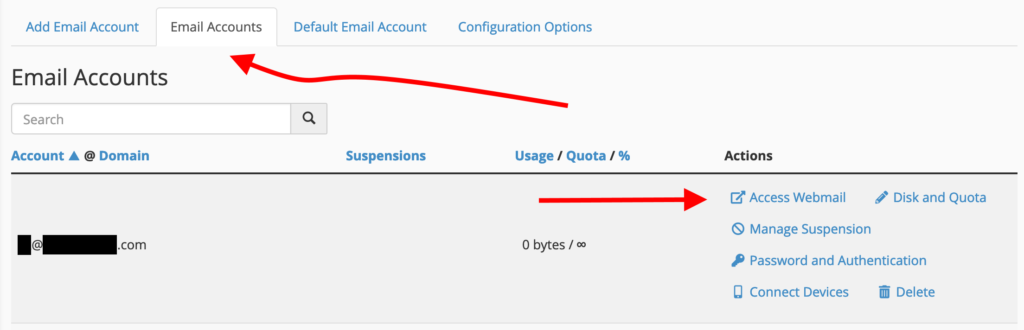
This step starts a bit counterintuitive, but bear with us. So, to actually configure your email locally, you first need to click on the 'Access Webmail†link that's visible next to your address in the 'Email Accounts†tab:
This will take you to a new panel. Once there, scroll down to the section labeled 'Mail Client Automatic Configuration Scriptsâ€. You'll see something like this:
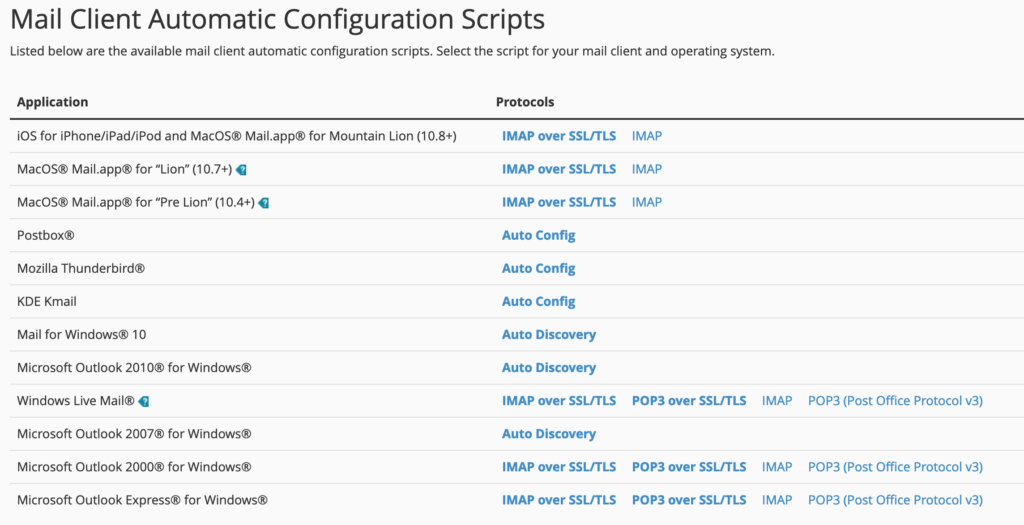
There's a range of useful links there, all of them with either instructions or ready-made configuration scripts for some of the most popular email clients. If yours is on the list, just click on the link next to it and finish the configuration according to the advice given.
If you can't see your client, or you want to configure your email manually, then below this section is another one labeled 'Mail Client Manual Settingsâ€.

You'll find all the info you need there.
At this point, accessing your webmail is very easy. Click on the 'Access Webmail†link that's visible next to your address in the 'Email Accounts†tab:
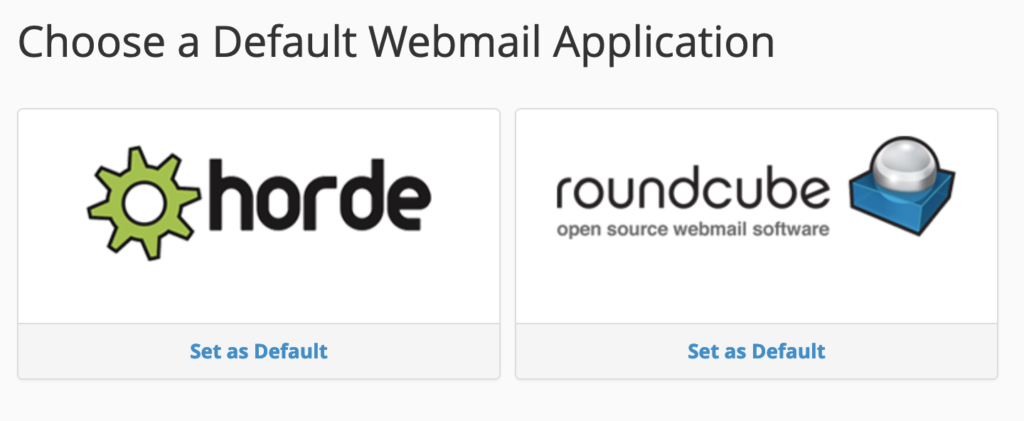
Once there, click on one of the available webmail clients:
You'll be taken to your email inbox immediately.
Alternatively, you can access your webmail straight from a web browser. Simply navigate to http://YOURDOMAIN.com/webmail and you'll be greeted by this screen:
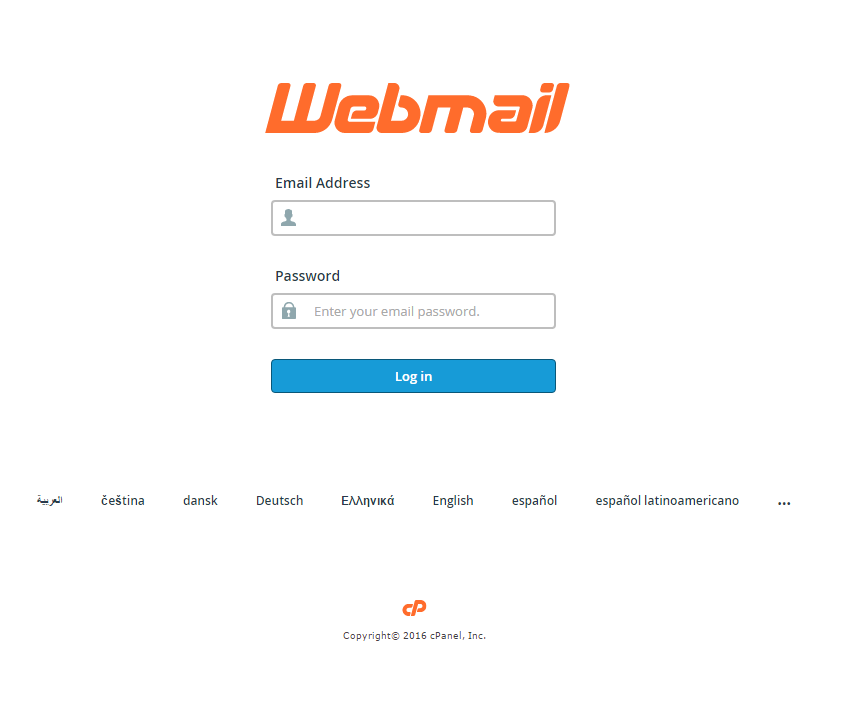
Enter the email address and password, and you're in.
Let's say you want to have your emails that arrive at YOUREMAIL@YOURDOMAIN.com to be forwarded to another address you already own - like YOUREMAIL@gmail.com.
First, click on 'Forwarders†to arrive on this screen:
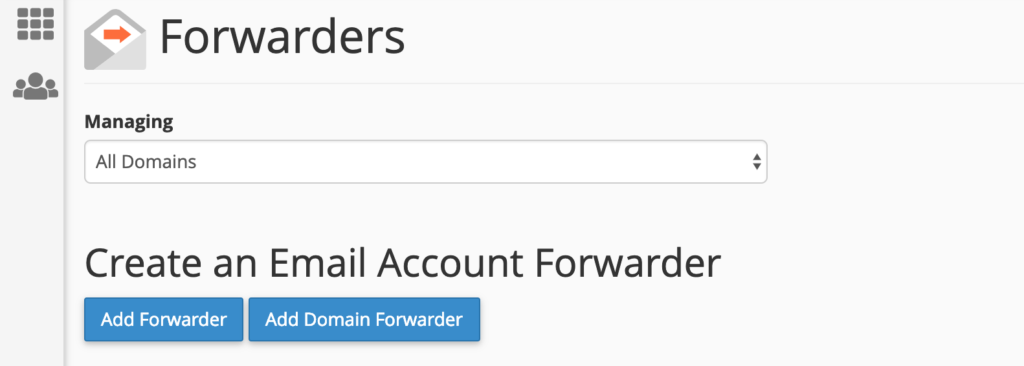
From here, you can either create a simple email forwarder or a more serious forwarder for your whole domain name. We'll stick with the former here.
To forward your email, click on the 'Add Forwarder†button. You'll see this:
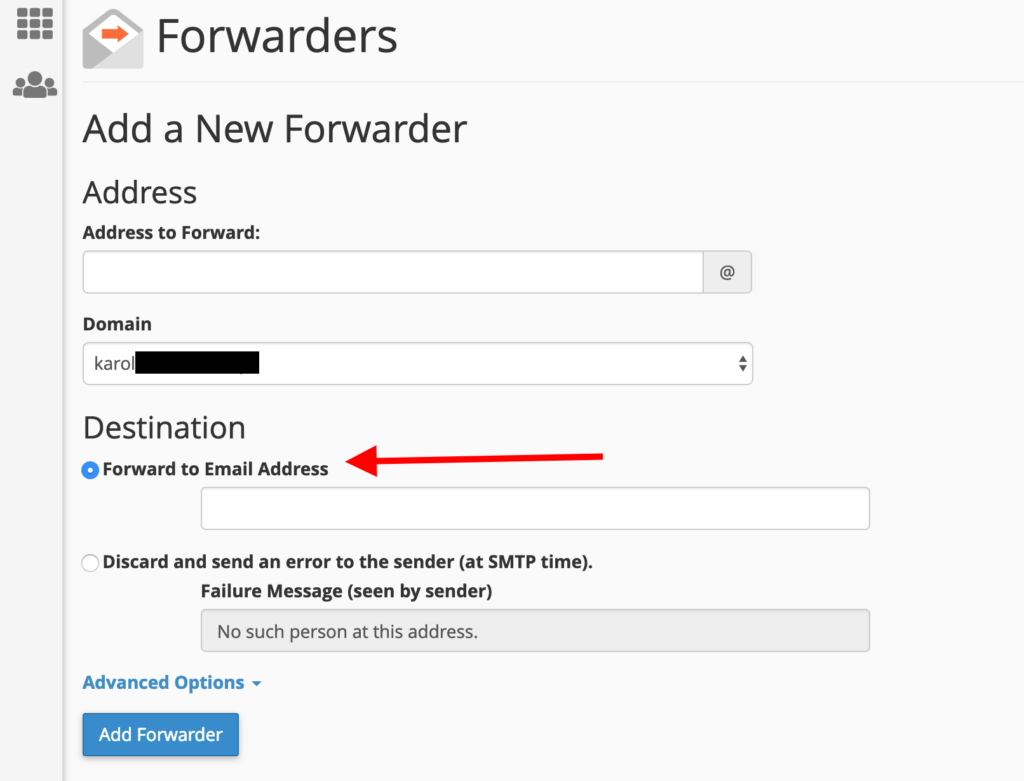
Here's what these fields mean:
john@domain.com then the user part of it is johnjohn@domain.com then the domain part of it is domain.comClick on 'Add Forwarder†to set everything up.
Default email addresses are an interesting perk that you get when hosting your email inboxes yourself - as you do with cPanel.
Basically, you have the ability to catch any incoming email that is sent to an invalid email address under your domain name.
What this means in practice is that you can use nonexistent email addresses when signing up for various online tools/services/profiles and still have those emails get to you no problem.
Here's an example; let's say you have just one email address set up for your domain name, and it's john@johnsworld.com. However, when signing up for Netflix, you don't want to use that address since you're worried that it might eventually leak onto the web and get picked up by spambots. In that case, you can just use something like netflix@johnsworld.com and still make it work.
Here's how to set that up:
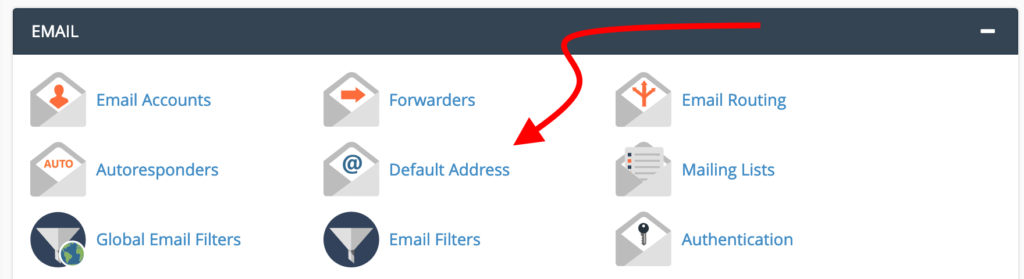
Click on 'Default Address†from the 'EMAIL†section in cPanel:
You'll see this:

You're all set.
Everybody hates spam, luckily, with cPanel, you can keep it from ever hitting your inbox.
Click on 'Spam Filters†to see the available options:
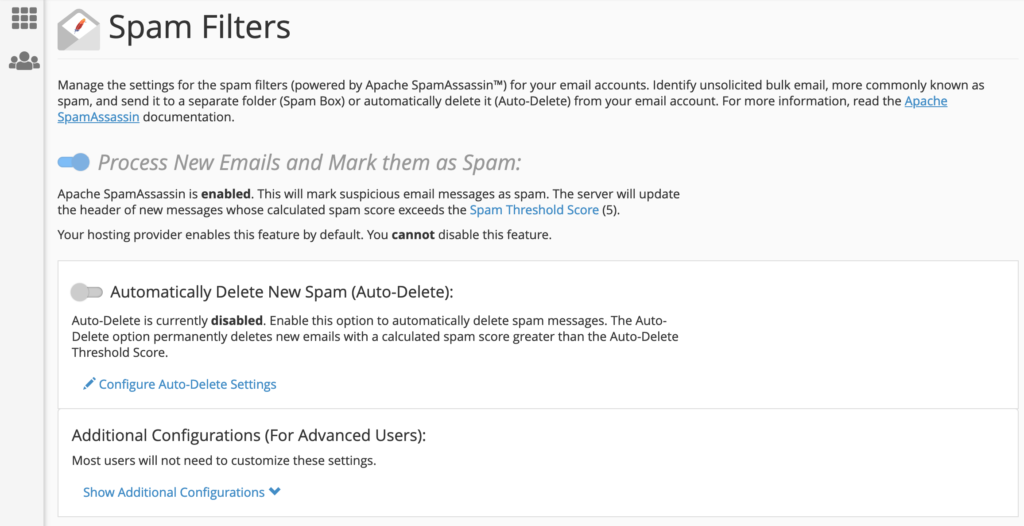
Depending on the settings that your web host allows, you may or may not be able to do much in this section. The spam filters themselves are often on by default and you cannot disable them (like it is in my case). However, you can still fine-tune how the filters work.
The first setting to consider is the one labeled 'Automatically Delete New Spamâ€. While it may seem like a good idea at first, you're actually better off leaving that one. The issue here is that you can encounter a lot of false positives with spam filters - emails that are falsely graded as spam. Therefore, you want to be able to take a look into your spam folder every once in a while and have a quick glance if anything there requires your attention. With the auto-deletion turned on, you won't have this possibility.
Under 'Additional Configurationsâ€, there's a link to show more options. Once you click on it, you'll see this:
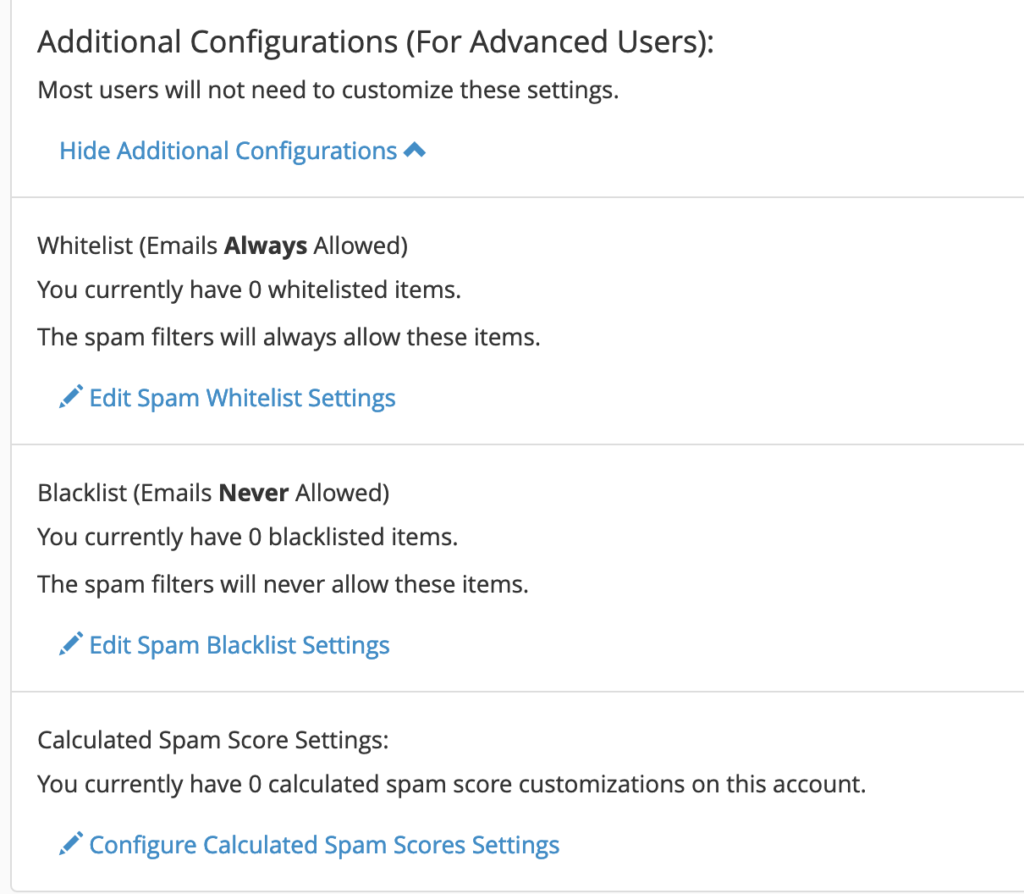
You can experiment with these settings to manually whitelist or blacklist certain email addresses. It's probably a good idea to whitelist all emails from your company or any other crucial contacts from your network.
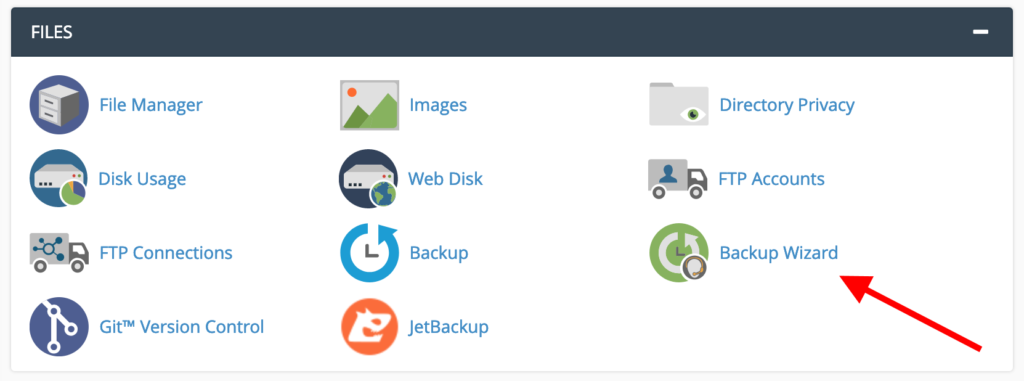
The 'FILES†section of cPanel is your go-to spot for uploading files, backing up your website and managing your files via FTP *.
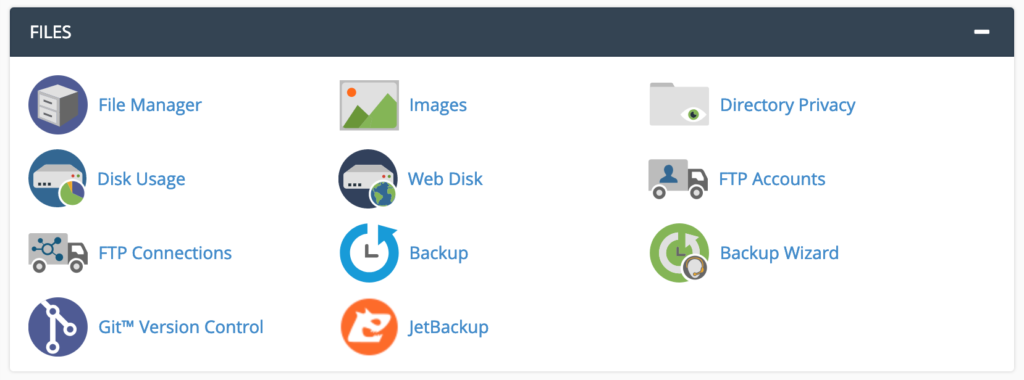
* FTP stands for File Transfer Protocol. You can use FTP to manage the files associated with your website - whether that means uploading, reading or retrieving them. All you need to use FTP is a client application such as FileZilla. Alternatively, cPanel also provides you with tools to manage your files without an FTP tool. We'll cover that next.
The first space you'll want to get acquainted with within the 'FILES†section is the 'File Managerâ€.
The 'File Manager†allows you to manage all of your sites' files directly from within the cPanel interface rather than having to use a third-party FTP tool.
Click on the 'File Manager†icon (visible in the screenshot above) to begin. What you'll see is the central panel of the 'File Managerâ€. It'll look something like this:
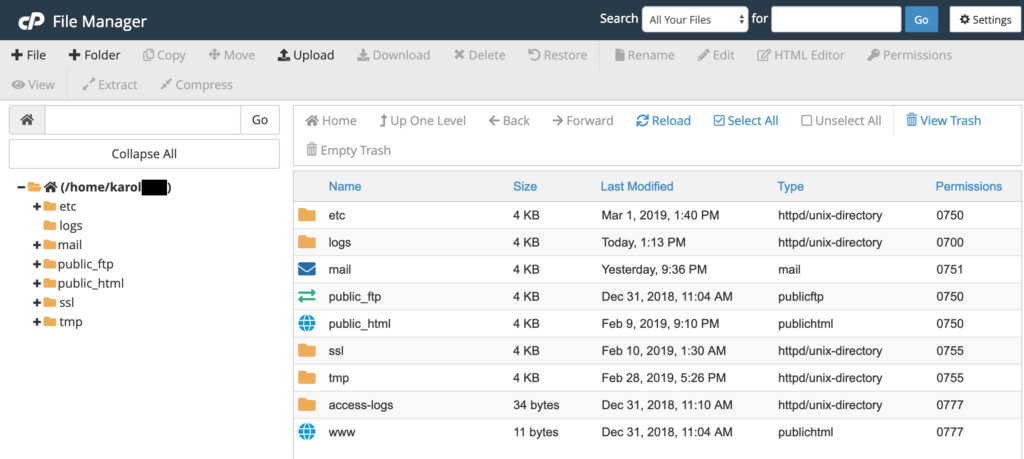
This is where you can take care of all the files on your server, therefore you'll want to proceed with EXTREME caution when making any changes.
There are a couple of quick things to point out on this screen. First, on the left, you'll find your root (main) folder and some sub-folders (you can see this in the screenshot above).
Then, in the middle of the screen, you'll see the contents of whatever folder you have selected.
Knowing this, here are a few things you might want to do:
To create a new folder, simply click on the '+ Folder†button along with the top menu, as shown below:

You'll then be asked to name your new folder and enter the destination where the folder will be created.
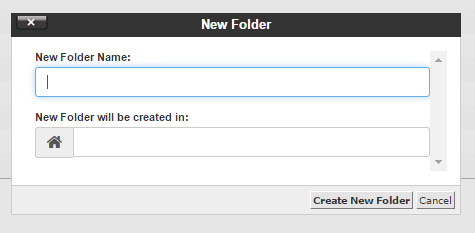
When you're done, click on 'Create New Folderâ€, and you're set.
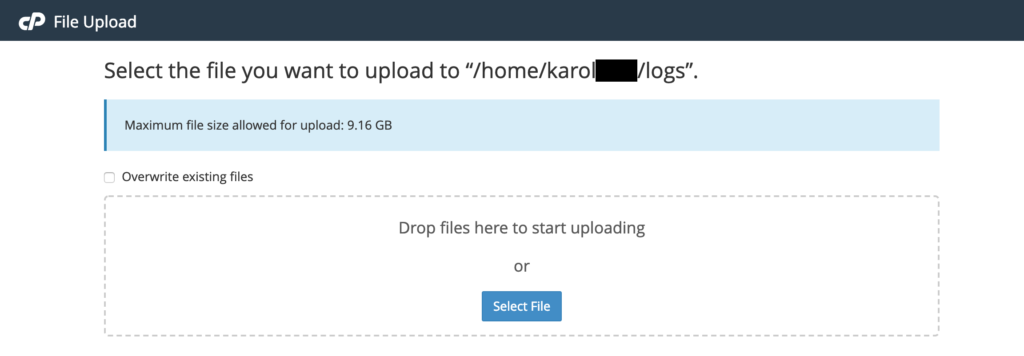
To add a file - for example, a large video file that you want people to be able to download, or a full-quality photo you want to use on your site - you'll first need to click on the folder where you want to upload the file to.
Then, just click on the 'Upload†button that's in the top menu:

You'll be asked to drag and drop the file you want to upload, or simply select the file from your local drive:
? Note; If your website software allows you to upload files from its user interface, do that instead of going to the File Manager in cPanel. Since you're going to be using those files on your site anyway, it's just easier to manage things that way - your website software will 'see†the file immediately. If you upload a file via the File Manager or FTP, that might not be the case. WordPress works really well with files.
Depending on how your web host has set up your cPanel account, you might be able to log in to your main FTP account using the same cPanel login and pass.
To check if that's the case, click on 'FTP Accounts†from the 'FILES†section. Once there, scroll down to 'Special FTP Accountsâ€. Your main FTP account should be there.

By default, the main FTP account will have access to the root folder.
Creating new FTP accounts is a good practice when working with cPanel and launching new projects/websites on your hosting setup.
Having one account per project is a good starting point. The idea is that you give those individual accounts only access to the specific folder they need access to - not to the whole web server.
To create new FTP accounts, click on 'FTP Accounts†form the 'FILES†section. You'll see this screen:
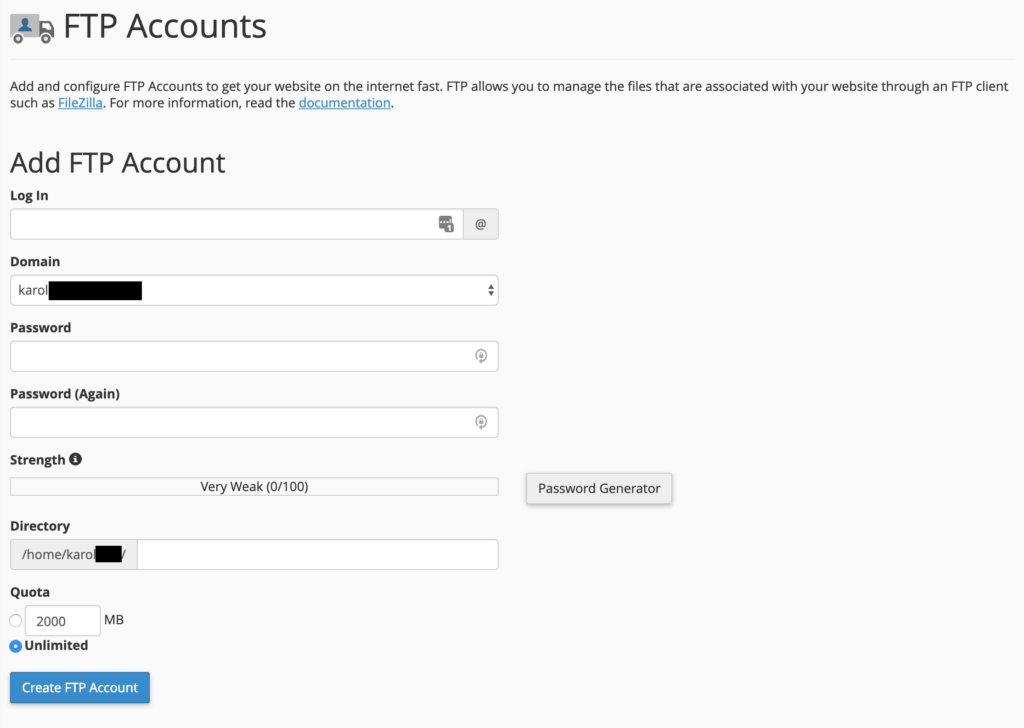
Here's how to fill out that form and create a new account:
Once you click on 'Create FTP Accountâ€, the new user will be added.
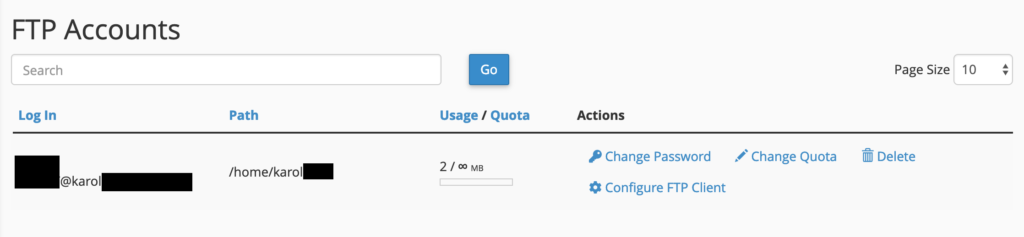
You can manage your existing FTP accounts on the same page, below the new user form:
Most modern websites cannot exist without a database running quietly behind the curtains and handling the website's data.
In other words, all of your website's content, all the pages, all the posts, and all the user data is kept in the database.
As you would expect by now, cPanel has a pretty extensive module allowing you to create and manage databases.
If you want to set up any modern website using a CMS, you'll need to create a database for it first.
The 'DATABASES†section of cPanel has a handful of options available:
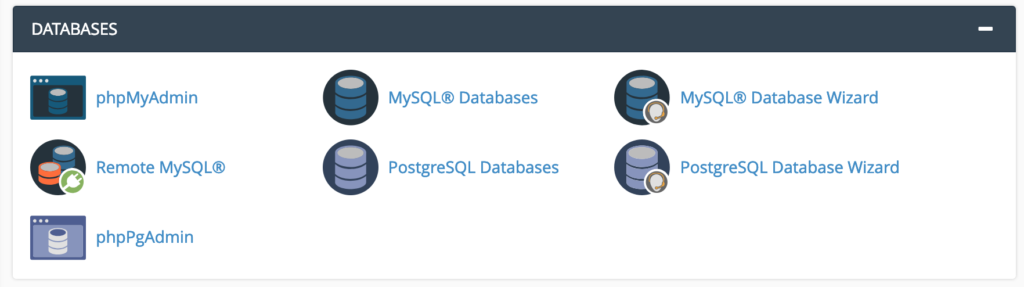
Most importantly, cPanel allows you to work with both MySQL and PostgreSQL databases. For the purpose of this guide, we'll stick to MySQL, but working with PostgreSQL is nearly the same.
To create a new database, click on 'MySQL Database Wizard†in the 'DATABASES†section (see above).
Once there, you can start setting up your new database.
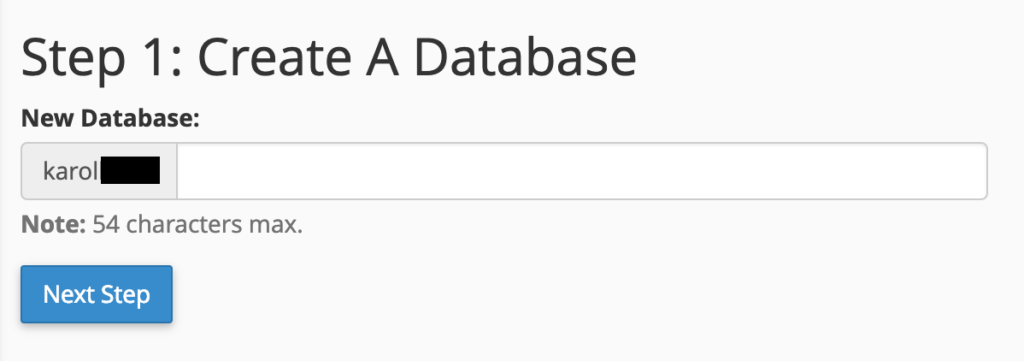
Step 1: set a name for your database:
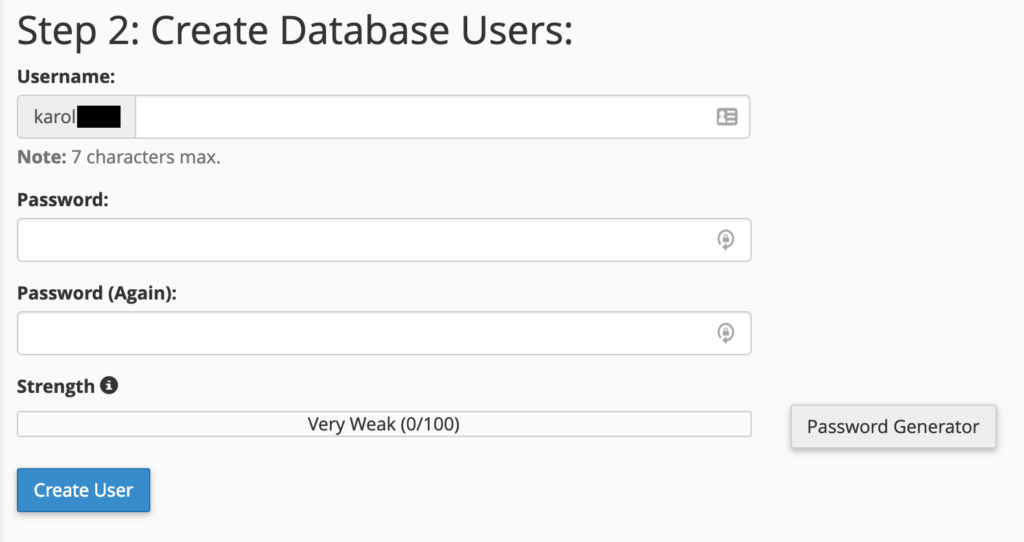
Step 2: create a database user that will be used to access the database (this is required in order to work with the database later on):
Step 3: assign the required privileges to that new database user; it's best to select the option labeled 'ALL PRIVILEGESâ€, like so:

Step 4: done.
At this stage, your new database has been set.
To see it, go back to the main page of cPanel and click on 'MySQL Databasesâ€.
To see all your databases, go to 'MySQL Databases†from the 'DATABASES†section of cPanel.
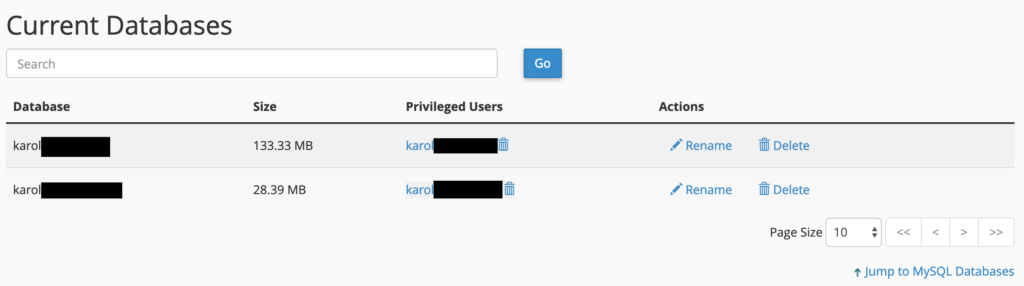
Each database can be renamed or deleted through the links to the right.
Additionally, you can also manage your database users there, a bit further down the page.
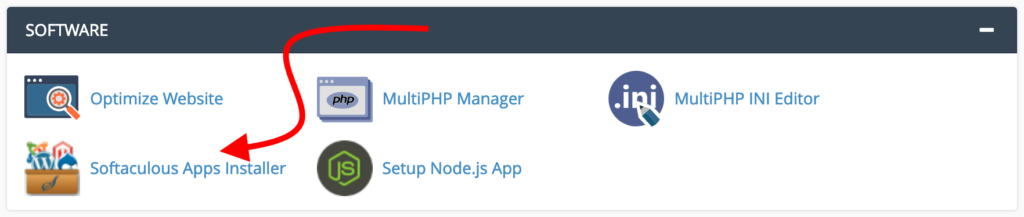
The next thing we're going to show you in this cPanel tutorial is how to install WordPress (and other useful server apps). This will SERIOUSLY speed up the process of getting your website up and running.
First, locate the 'SOFTWARE†section in your cPanel, then click on 'Softaculous Apps Installerâ€:
The name of this tool is a little deceiving as it's not just apps you can install but content management systems, too.
You'll see a screen like the following, FULL of apps you can install with a handy menu on the left:
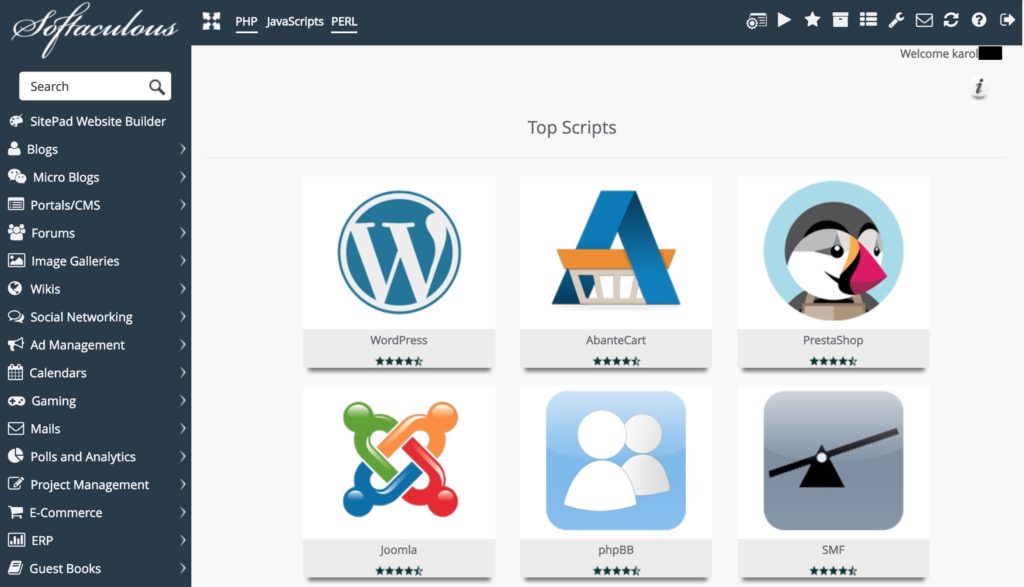
As you can see, Softaculous has every web app imaginable there. As you take a look at the sidebar, there are installers for blogs, microblogs, forums, wikis, e-commerce, and a lot more.
You can take your time and look around, see what's available. However, for the purpose of this cPanel tutorial, we're going to cover how to install the most popular and widely used website platform of them all - WordPress. Did you know that WordPress runs more than 30% of all websites? Again, that's all the websites.
Installing WordPress through Softaculous is super simple. You'll see the WordPress logo as the first option in the center part of the screen. Put your mouse cursor over that icon and the 'Install†button will appear. Click on it.
You'll see a screen like this:
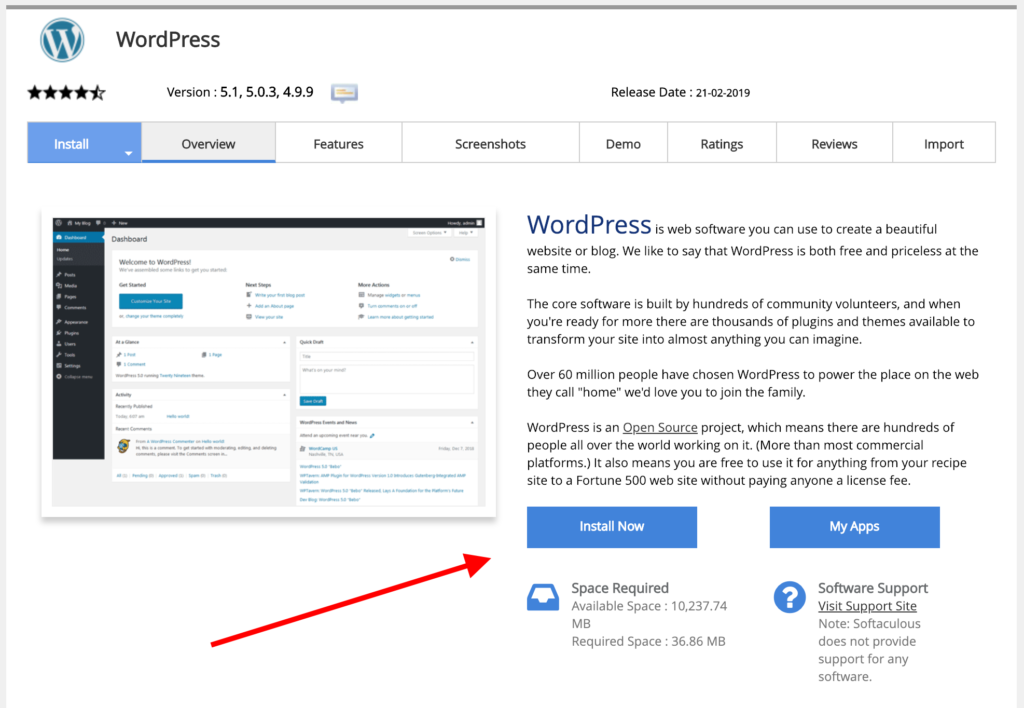
Click the blue 'Install Now†button to begin. Softaculous will show you the following form:
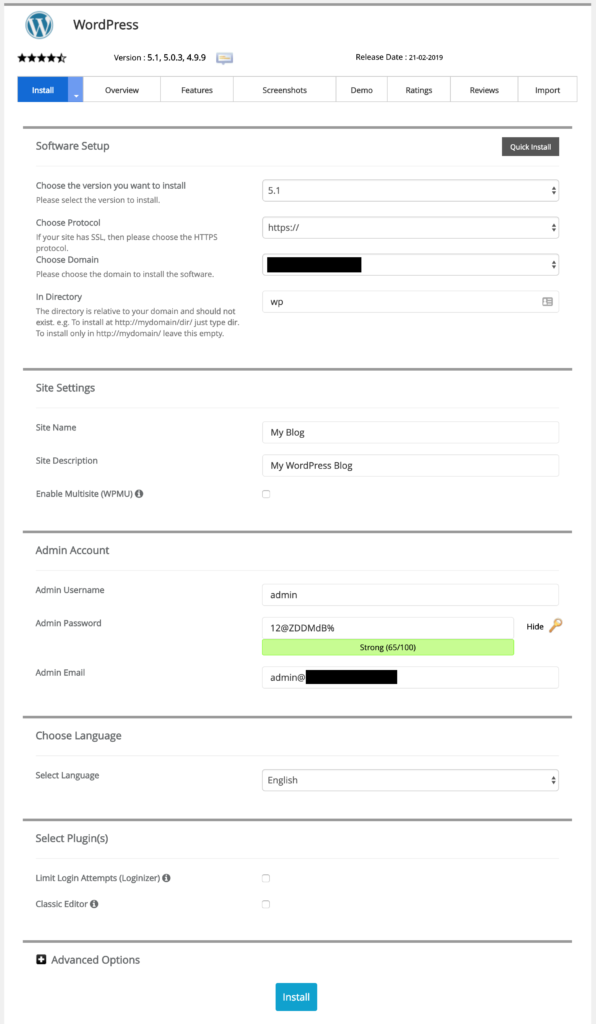
Here's what Softaculous needs you to fill out before a WordPress installation can be performed.
The 'Software Setup†section:
https:// if it is available (this allows you to integrate your site with an SSL certificate). If not, http:// will do as well.YOURDOMAIN.com. If you're adding WordPress as a blog to an already existing site, you'll want to set the directory to something like blog or news.The 'Site Settings†section:
The 'Admin Account†section:
admin, though you might want to change it to something more complex. You're going to be a lot more secure with a username like my-dog-likes-cuddles. Why? It's just exceptionally more difficult to guess, hence making it harder for a hacker to break into your site.The 'Choose Language†section:
This is pretty self-explanatory. Go with the language that matches the target audience of your future website. For example, if you're in the US, and you want to target a Spanish-speaking audience, select WordPress language as Spanish.
The 'Select Plugins(s)†section:
This one is optional. If you want to, you can install some handy plugins right from Softaculous. We're not going to get into that for now. You can install plugins later on very easily.
The 'Advanced Options†section:
No need to bother with any of the advanced options for now.
The 'Select Theme†section:
Depending on your host's setup of Softaculous, you might also see the option to pick a WordPress theme to be installed on your site right out of the gate.
You don't need to bother yourself with that now. Choosing a theme is an important step, and it's actually easier to do later on - once your WordPress has been fully installed. The theme selection that Softaculous shows you are limited.
Feel free to ignore that section for now.
Once you've gone through all these options, click on 'Install†to get the installation finalized.
After a minute or so, Softaculous will let you know that your WordPress has been installed successfully. You'll also see direct links that you can use to log in to that fresh new installation.
Usually, you can log in to your WordPress install by going to YOURDOMAIN.com/wp-admin/.
If you've ever had a phone or computer die on you, you know how devastating it can be if you haven't backed up your data.
Now imagine the same happening to your website. This is perhaps even worse since it's very likely your website is your business.
Luckily, cPanel makes it incredibly easy to keep this tragedy from happening by giving you a chance to back up your site manually - any time you choose.
? Note; Some web hosts will handle backups for you automatically. Check with your hosting provider to make sure. Still, learning how to back up manually can prove a valuable skill in the future.
To start a backup, click the 'Backup Wizard†icon that's in the 'FILES†section of cPanel.
You'll see this screen:
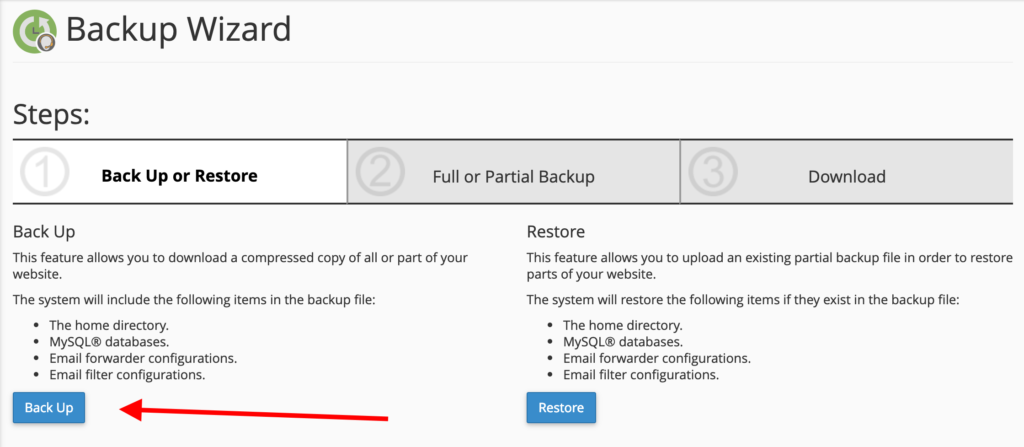
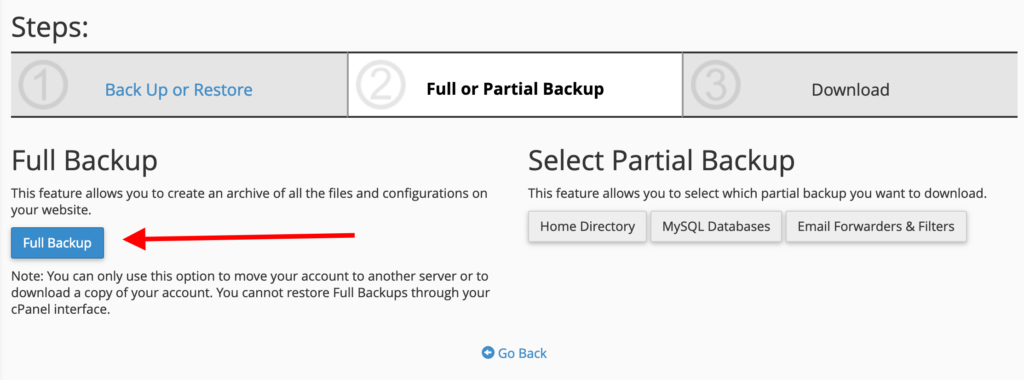
Click on the 'Back Up†button to start the backing up process. You'll be shown a screen where you have the option to choose whether you want a full backup (all the files and configurations on your websites) or partial backups (home directory, MySQL databases, email forwarders & filters).
To make it easier, back up your entire account and save it to an external hard drive or another secure location.
Once the backup completes, you'll be able to download it.
Some hosting setups come with unlimited disk space, while others do put a cap somewhere. You can check how much of that space you're using up via cPanel.
? Note; It's important to check your disk space periodically to see what parts of your website are taking up the most room, so you know where to compress or delete unnecessary files if you're running out of space.
To get a general overview of your usage, just take a glance at the right sidebar of cPanel. You'll see various info on how much disk space you're consuming, how many databases you've set up in total, and more.

To get a more in-depth look, click on the 'Disk Usage†icon from the 'FILES†section.

What you'll see is a nice summary of how much space your different folders are taking up.
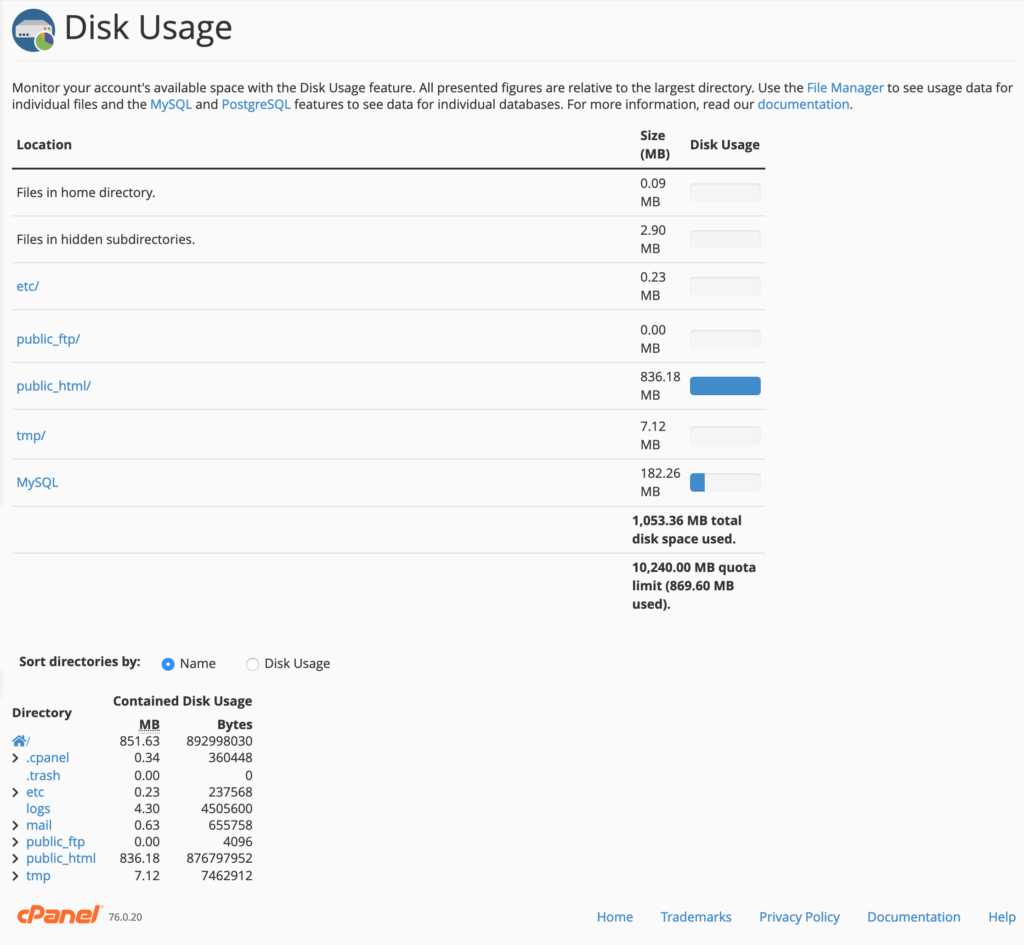
You can also see your quota or limit along the bottom of the first table - in this case, the quota in the image above is 10,240MB (or 10GB).
It's important to note that just because a blue bar is full doesn't mean you've used up all your space - all presented figures are relative to the largest directory.
The final thing that's worth a look as you're going through cPanel is the section labeled 'METRICSâ€.
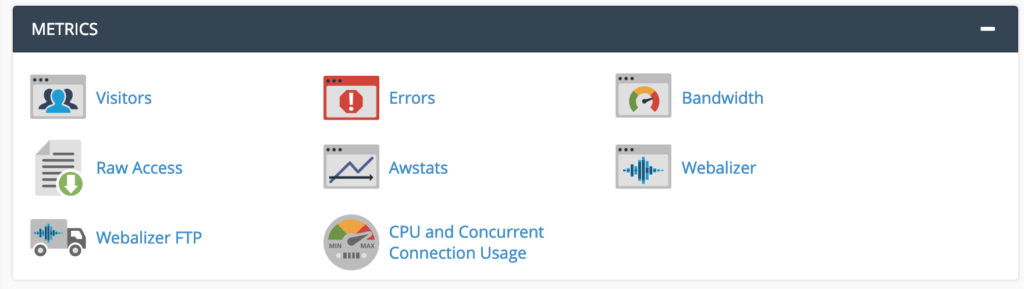
You can find a lot of interesting details there, all informing you about the current status of your server, the number of visits you're getting, and the overall health of the setup.
Each of these stats sections presents a slightly different take on your numbers: